Plant Nutrition for Spring Production
I’m biased … but I do think this is one of our best videos related to crop nutrition. It’s concise, with a ton of great info packed into 25 minutes, and perfect to share with your entire production team.
HERE’S A LINK TO SPRING PREP: PLANT NUTRITION.
For this one, I was joined by Dr. Josh Henry, a frequent contributor to this newsletter and a technical specialist with extensive expertise in plant nutrition and fertility. Josh takes you through a range of topics related to crop nutrition with the goal of setting you and your team up for success with spring production.
In this discussion, Josh covers an early-season checklist that includes water testing, injector calibration and the importance of having an in-house testing toolbox handy. Then he digs deeper into options for fertilizer—macronutrients and micronutrients—and tips for adjusting pH up or down.
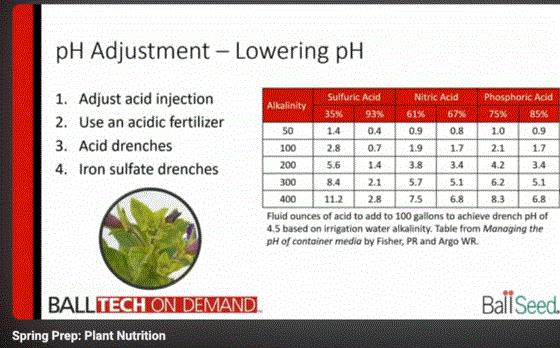
To help round out the topic, there are some additional resources to check out. Some of these were mentioned by Josh, while others have been created since we originally uploaded the video.

Nick’s Tip of the Week: Transplant Buckets & BMPs
Each week, I’ll work with my buddy Nick Flax, a technical services expert at Ball, to share a concern that’s come up during one of his numerous calls with growers across North America. This week, he’s addressing just about everything you need to remember when transplanting. It’s a long one ... but 100% worth the read!
PROBLEM: Over the past week or so, lots of growers have reached out with issues that tie back to problems that occurred before, during or immediately after transplant. It’s easy to get caught up in the whirlwind of early spring and miss key steps or overlook opportunities to get your finished crops started off as strong as possible.
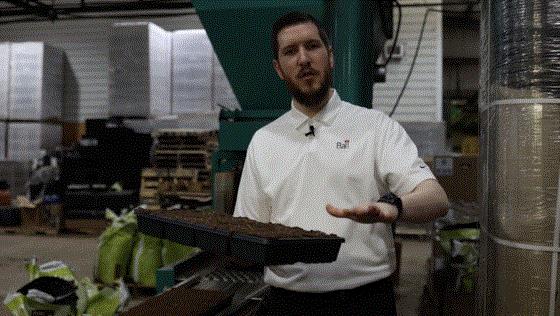
NICK’S TIP: There are many factors to keep on your radar during the transplant process. Simplify the way you think about transplanting BMPs by putting them into three “buckets”: before, during and after transplant.
Before Transplant
Believe it or not, best practices start before anything hits the transplanting line. This includes considerations that pertain to young plants still in their trays, growing media, and even integrated pest management (IPM).
Ensure young plants are well-watered prior to transplant. Never plant dry plugs or liners into finished containers. On the 1 to 5 moisture scale (1=air dry; 5=saturated), plug media should be between a moisture level 3 to 4 at transplant.
-
Dry young plants can experience drought stress quickly when put into finished containers. This is especially true if they sit on racks for a while before going out to the greenhouse.
-
If a crop is too dry, irrigate them slightly, but don’t saturate the media to moisture level 5.
-
Bump them to the back of the line for the day to allow plants to recover from any drought stress, and drain off any excess free moisture.
“Prime” your plugs/liners. If you can hold young plants for about one day before transplant, consider giving them a shot of fertilizer at around 250 to 300 ppm N before they leave their trays.
-
Many young plant producers leach young plants slightly before ship to improve tone and reduce the chances of leaf/stem breakage during transit.
-
A shot of fertilizer the day before transplant can help replenish mineral nutrient reserves and jumpstart growth to get plants established more quickly.
-
“Softer” fertilizers with higher proportions of ammonium-based nitrogen (N) and elevated phosphorus (P) are generally best for this application (ex. 20-10-20).
Ensure that finished growing media is adequately moist. Growing media should be between a moisture level 2 to 3 when flats/pots are filled prior to transplant.
-
Too-dry media can actively pull moisture away from your plug/liner once it’s transplanted.
-
Overly dry media can be hydrophobic and difficult to rewet in finished containers. This can lead to formation of dry, “dead space” in the root zone that stays inhospitably dry for most of the crop cycle, which will stifle root development.
Treat “At-Risk” crops with appropriate pesticides. Whether you have downy mildew (DM)-susceptible crops or broad mite-prone species going into finished containers, give them a strong start and treat for these known risks while plants are still at high density in their trays.
-
Following label regulations, treat DM-sensitive crops with appropriate fungicides (ex. Segovis or Subdue MAXX). Not only will this get protection on crops earlier in the cycle, but it can reduce your total cost of application (less spray/drench volume needed for a few plug/liner trays vs. several hundred/thousand flats, pots or hanging baskets).
-
Consider plug/liner tray dips with appropriately labeled insecticides/miticides to catch any “hitchhikers” early, before they can multiply over time in your greenhouse. Many oil-based products and other classes of biopesticides are labeled for use in this sort of application.
During/On the Planting Line
It’s easy to make mistakes or get “handwork hypnosis” when you or your crew spend hours on the line this time of year. Even automated transplanters can fall out of calibration and cause issues, so perform periodic spot-checks throughout the day. This can help you avoid downstream issues or the need to rework crops before plants hit the greenhouse.
Check container fill regularly. Ensure that all pots/flats have a uniform, loose fill (no compaction), and that containers are filled with media all the way to the top edge of the pot/flat insert.
-
Remove large sticks and debris before young plants are put in.
-
Break up or remove any large clumps of growing media.
-
Periodically take a pot/flat insert and test for compaction. You should be able to poke the full length of your index finger down into the soil column with little effort. If media is so compact that you have to use much force, adjust your pot/flat filler to loosen the fill. A combination of belt speed and/or roller/brush adjustments will typically do the trick.
Dibble a hole appropriately sized to your input. This may seem straightforward but it a common problem that I see in freshly transplanted crops.
-
Don’t make a massive crater in the middle of the pot for a 512-plug and don’t cram a 50-cell plug into a hole better suited to a 288-plug.
-
Have a few standard dibblers readily available on your transplant line and ensure that your crew knows which size to use and when.
-
Ensure that the top of the plug/liner media is level with the top of the growing media in the finished container. If plants are too deep, slow rooting may occur and the potential for stem rot issues greatly increase. If plants are sticking out of the top of the soil, plugs/liners may dry down too rapidly and become stressed.
NOTE: There are exceptions to this rule. For example, cyclamen plugs should be planted slightly above grade of finished container media … so be sure your crew is aware of any such crops beforehand.
Water plants in immediately after transplant through a water tunnel. A water tunnel with multiple, consecutive stages of emitters that provide gentle streams of water work best.
-
You do NOT need to water plants up to container capacity on the transplant line. The goal is to provide at least 1/2 of the total water needed and provide the rest once plants are out in the greenhouse.
-
This will help “glue” young plants into place and minimize the potential for dislodgement during transit to the greenhouse, reduce the risk of drought stress, and begin to develop headspace in the top of the containers.
Lastly, don’t leave fresh transplants on racks for days on end—get them out into the greenhouse ASAP!
After Transplant
This is your final opportunity to make necessary adjustments and get plants started off on the right foot. Be sure to:
Double-check plug/liner planting depth. If you notice that some young plants have gotten buried during the transplant and transit process, take a few minutes to adjust their depth while setting them down on the bench/floor.
-
It’s WAY easier to adjust plant depth before they’ve started to root in!
-
If adjustments can be made while offloading them from carts, this minimizes the number of additional “touches” to the crop.
Water plants in the rest of the way. A common “oops” that occurs after transplant is forgetting to water plants in the rest of the way. Failure to do this can have a major impact on crop establishment and other downstream issues. Watering crops up to container capacity:
-
Finishes development of headspace in the tops of containers, and
-
Solidifies the soil “matrix” and (effectively) connects all the substrate components in each pot or flat insert.
Well-developed headspace ensures that future water, fertilizer or pesticide drench applications can move through the soil column as a front when headspace is filled quickly at the time of application. A well-formed soil matrix ensures that there aren’t any dry pockets in the soil column, that any potential air pockets collapse, and roots can utilize the entire soil profile to develop.
-
Depending on your fertilizer strategy, you can do your final watering-in with clear or water-soluble fertilizer (WSF).
-
In general, it’s best to water finished crops in with WSF. Nutrients are readily available to plants as soon as it's applied and you can adjust the ppm N as needed, depending on the crop.
If you have controlled-release fertilizer (CRF) in your mix, you can choose to just apply clear water at this stage. However, there is bit of lag time for the release of nutrients from CRF. As such, an initial fertigation with WSF after transplant—even at a lower concentration (around 150 ppm N)—is generally advisable if you have CRF mixed into your soil.
Release any biocontrols. It’s never too early to get your IPM strategy working. Once plants are in their destined growing space, deploy any of your mainstay predators and/or parasitoids to keep pest populations low from the get-go.
-
If any of your young plants received pesticide treatment right before transplant, be mindful of any potential residual effect on your bios.
-
Many predatory mites and insects do not like high levels of canopy moisture. If foliage is still very wet, you may want to wait a little while until the canopy dries somewhat to release these.
-
Wait until after you water crops in all the way to deploy things like parasitoid pupal “hang tags” (ex. Encarsia/Eretmocerus) or they may become dislodged or completely soaked by overhead irrigation.
VIDEO: Join Nick for a walk through a greenhouse transplant line.

PGR Guide for Your Pocket
I’ve seen a handful of plant growth regulator (PGR) questions popping up lately in Facebook groups and activity reports so it’s probably a good time to direct you to some resources to help in PGR selection and use. One easy-to-digest document I found is from Purdue University Extension, in partnership with a group of researchers from leading universities. It’s one you can print out and post for your production managers to reference when needed.
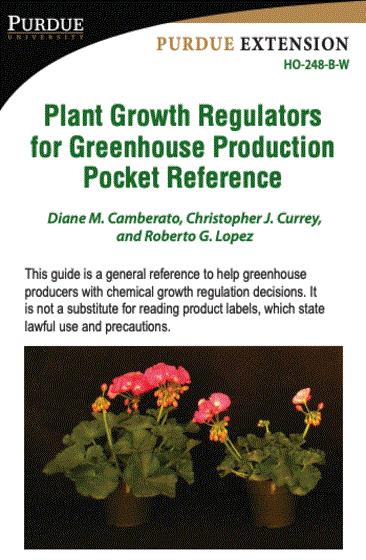
The Purdue experts explain that many PGRs successfully reduce internode elongation, decreasing plant height to control the crop growth. Some of the actives in this category are ancymidol, flurprimidol, chlormequat chloride, paclobutrazol, daminozide and uniconazole. Other PGRs include plant hormones or gibberellins, which impact cell elongation and division, as well as flowering. All of these and more are covered in this POCKET REFERENCE on PGRs for greenhouse production.
Of course, there’s also OUR PLAYLIST of short PGR videos I mentioned a couple weeks ago, which continues to expand with more to come … and because it’s easily accessed via your phone, it’s also technically a “pocket-sized” resource.

QUICK TECH TIP: Verbena Deficiencies
Earlier this week, a reader reached out about a tech tip from a past newsletter that he was having a hard time putting his finger on. I searched it up and was able to send it his way. In doing so, I figured I might as well share it again since it was a few years ago and the info is still relevant.
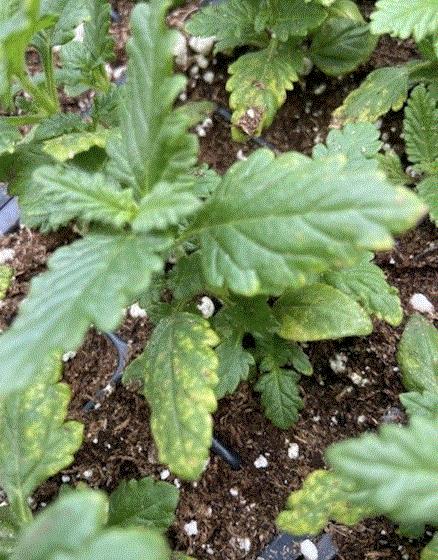
Above is a photo we got from a grower who wondered why he was seeing lower leaf chlorosis on a verbena crop. Our team worked with the grower, asking the necessary questions and running through many variables to come up with this diagnosis.
Magnesium deficiency is commonly reported as lower-leaf, interveinal chlorosis. It can happen when too much calcium nitrate is applied in an attempt to keep plugs toned. Our experts felt this was the most probable explanation. They suggested an application of epsom salts (MgSO4) at 1 lb. per 100 gal. of water, which should correct the issue.
In addition, old PGR phytotoxicity may also be plausible. It appears the new leaf expansion is good, so if this is the cause, there’s no need to be concerned. A distant possibility is potassium deficiency. This can happen when plants don’t have enough fertilizer and are grown cool.

2026 ACT Grower Summits Announced
An innovative group of companies with a collaborative approach to sharing information, research and educational content with growers hit my radar a couple years ago, although I think they’ve been around for a bit longer than that. It’s the ACT group (Advancing Cultivation Technology) that was formed by four major companies in the industry—Grodan (substrates), Philips (lighting), Priva (environmental controls) and Svensson (climate screens)—to share technology strategies and best practices with growers.
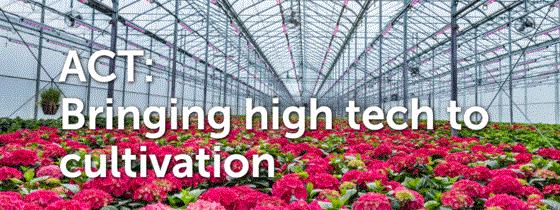
Two of the awesome things ACT brings to our industry is a series of in-person events they call summits, plus virtual/digital education like webinars. THREE EVENTS have been finalized and announced for 2026 promising expert presentations, roundtable discussions and opportunities to speak directly with all of the experts at a post-summit reception.
-
Leamington Grower Summit: March 31 in Ontario
-
British Columbia Grower Summit: May 6 in Surrey
-
Quebec Grower Summit: September 9 in St. Hyacinthe
If you want to get a taste of what ACT has to offer and the excellent level of information shared, CHECK OUT SOME OF THEIR PAST WEBINARS.

Finish Line ...
I haven’t solicited input for a while, so this week I’m going to close with a request:
Please EMAIL ME some of the resources you and your production team use when you need answers to greenhouse questions. Our Tech On Demand team is continually building a database of trustworthy sources of information, and I’d also like to share them in the newsletter. Maybe it’s a local university with a good database of research articles, or an association you support. Are there breeding company websites with easy-to-use culture and technical resources you commonly turn to with questions? Whatever you use, send it my way. Thanks in advance!
Please feel free to send your comments, constructive criticism and topic ideas to me at bcalkins@ballhort.com.

Bill Calkins
Editor—Tech On Demand
This email was received by you and 25,415 other fine subscribers!
If you're interested in advertising in Tech On Demand, contact Kim Brown ASAP and she'll hook you up.